Plugins
Plugins are fully integrated in Repetito 3.
Plugins can be added as virtual instruments or effect on Input Channels.
And plugins can be added as effects on Loop Channels and Mix Buses.
All standard types of audio plugins can be used: Audio Unit plugins on MacOS. And VST2 and VST3 plugins on MacOS and Windows.
Adding Plugins to Repetito
The first thing you must do to add plugins, is to tell Repetito where your plugins are.
Open the Options/Plugins menu page.
This will get you to the following window, which will be empty.
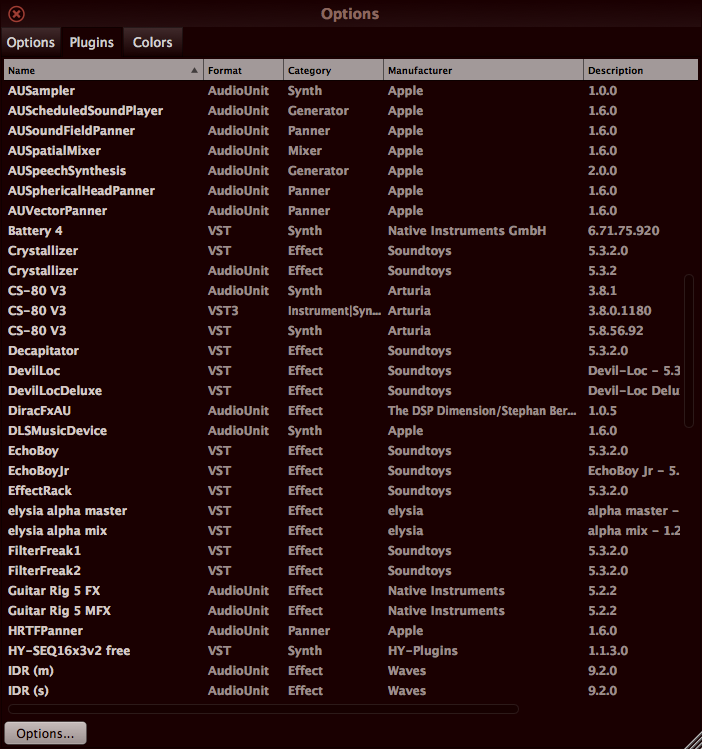
Click on Options at the bottom of the window, and select Scan for the plugins format you want, and add the plugins locations on your hard drive.
The above window should now be filled with the plugins which are installed on your computer. You should now be able to add plugins to Repetito Channels.
Adding Plugins to an Input Channel, a Loop Channel
Or a Mix Bus Channel
Adding Plugins to an Input Channel, a Loop Channel, or a Mix Bus Channel is easy.
Click on EDIT at the top the channel, and this will open the following Channel Edit Window:
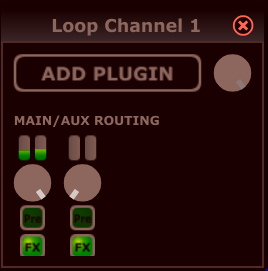
Click on Add Plugin and select the plugin you want to Add.
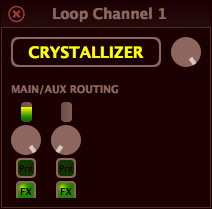
Once a plugin is added, this window will take the name of the plugin. The plugin window will also automatically open.
Removing a plugin
To remove a plugin, open the Channel Edit Window again, and right-click or cmd-click (ctrl-click on Windows) on the name of the plugin to open a menu and choose Remove.
Adding More than One Plugin to a Channel
It is possible to add more than one plugin to a channel. Click on the name of the plugin(s) on the Channel Edit Window and just add the plugins you need.
This way you can have a virtual instrument as well as an effect, if neither doesn’t take too much CPU power.
Once more than one plugin is instantiated on a Channel, you can change the order of the plugins. Click on on the name of the plugins, and select the plugin you want to move. The popup menu will let you move that plugin up or down in the list of plugins.
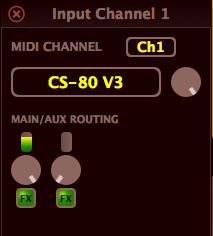
Plugins on Input Channels
When plugins are added to an Input Channel, you need to hear how the plugin is affecting the audio.
This is the case when adding an audio effect to an Input Channel, but this is even more the case when using a virtual instrument plugin on the Input Channel.
Therefore, Input Channels need to be routed to a Mix Bus, and the audio from the mix bus should be sent to loudspeaker or earplug monitors.
To route an Input Channel to a Mix Bus, use the Rotary Volume Knobs in the Main/Aux Routing section of the Channel Edit Window.
When plugins are added to an Input Channel, you need to hear how the plugin is affecting the audio, so that you play taking into account the actual sound. Therefore, Input Channels need to be routed to a Mix Bus.
Be careful when routing an input channel to a mix bus channel, since you can create an audio feedback (Larsen effect) if your input mic catches up the audio from your loudspeaker.
Choosing a MIDI Channel for a Virtual Instrument
Since virtual instrument plugins require MIDI note messages, it might be useful to select a MIDI channel for the virtual instrument on an Input Channel, so that you can use other MIDI channels for other virtual instruments on other Input Channels.
Do do so, use the combo box at the top of the Input Channel Window.