Parts can be used to structure a Song, for instance if you have an intro or a chorus.
Each Part has its own loops, its Main Loop as well as its Secondary Loops.
By default, the Parts Interface is not shown on screen.
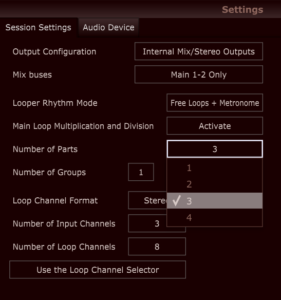
To show the Parts Interface, in Settings/Session Settings, select a value for Number of Parts greater than 1.
After doing so, the Parts Interface appears on the top right of the user interface.
Here is what the Parts Interface looks like:
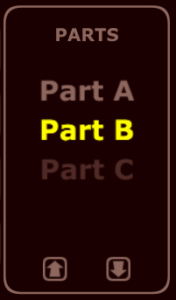
In the middle of this window are the different Parts which are available, according to the Number of Parts you selected in the Settings. Here we have 3 Parts, labelled Part A, Part B and Part C.
Notice the colors for these 3 Parts: here, Part B is the current Part, so it is highlighted. Part A is a non empty Part – meaning it has recorded loops – while Part C is grayed and is an empty Part.
Below the Parts are two buttons, one arrow going up and another going down. These two arrows are the only Part Interface commands.
Creating a Part
Following is the command sequence to start recording a new Main Loop on an empty Part, while playing the current Part:
- With the Parts Arrow commands, select the next empty Part;
- This next Part will now start flashing. This indicates that this Part is ready to record;
- Call Input Rec/Punch-In Punch-Out commands to start recording with one of the Input Channel. Since you’ve requested to transition to a new empty Part, the recording will not start just now but will wait until the end of the Main Loop of the current Part.
- At the end of the Main Loop of the current Part, the Part transition will automatically happen to the new Part, and the recording of the Main Loop of the new Part will begin with the selected Input Channel;
- Once you’ve played the Main Loop, call the Input Rec/Punch-In Punch-Out command again to stop recording the Main Loop.
- The Main Loop should now be playing on the new Part.
Note that neither the request to change Part nor the Punch-In commands are synchronized with the current Part being playing: both these commands need to be called sometime during the playback of the current Main Loop. Calling these commands will prepare for the recording of the Main Loop on the new Part. The recording will start automatically at the Part transition.
Changing Parts
Once a you’ve recorded two or more Parts, you can transition between them.
Following is the command sequence to change Parts:
- With the Parts Arrow commands, select the non empty Part you want to transition to;
- This Part will now start flashing. This indicates that Part transition will happen at the end of the Main Loop;
- At the end of the Main Loop of the current Part, the Part transition will automatically happen to the selected Part;
Parts Particularities
An Empty Part needs a Punch-In Request
While Repetito is playing, you cannot transition to an empty Part without Punching-In to specify which Input Channel you want to record:
If you have selected an empty Part, and you don’t Punch-In, the empty Part will continue flashing and the Part transition will not happen at the end of the Main Loop.
Cancelling Part transition
If you have selected another Part, and you finally decide not to change Parts, move the Part selector back to the current Part before the end of the Main Loop to cancel the Part transition.